


Quick Homemade Sauerkraut Recipe
- Total Time: 4-8 days
- Yield: 1 quart 1x
Description
This quick homemade sauerkraut recipe ferments for only 4-8 days. It’s cut in small pieces and turns out like a fine relish used for topping various dishes. It delivers tangy taste, probiotics when eaten raw, and loads of flavor when you cook the fermented cabbage with your meal.
Ingredients
- 1 medium head cabbage
- 1 1/2 tablespoons sea salt
- Filtered water
- 1 large cabbage leaf, left whole
Optional Additions:
- 2 fresh grape leaves (recommended)
- 1/2 - 1 teaspoon caraway seeds
Instructions
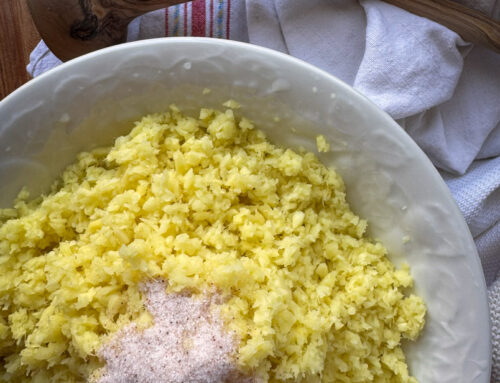
- Rinse the head of cabbage and remove the outer leaves. Remove one additional leaf and set it aside to use later in this recipe. Remove the core before shredding the cabbage.
- Shred 1 medium cabbage using the multipurpose “s” blade of a food processor (or use a cheese grater or knife).
- Place the shredded cabbage and 1 ½ tablespoons fine sea salt in a large mixing bowl. Add the optional ½ – 1 teaspoon caraway seeds. Stir to mix salt in evenly.
- Wait 5 minutes for the sauerkraut juices to release. If it’s still dry, use a wood tamper to press the kraut for a couple minutes. Let it rest again until the juices release.
- If using a grape leaf (optional), place it in the bottom of a clean quart size glass jar. Add the shredded cabbage to the quart sized jar by the ½ cupful.
- Use your fist, or a wood tamper, to press the cabbage down as you place each ½ cupful in the jar. Stop when the cabbage reaches the jar shoulder. Pack the cabbage in super tight. Pour any cabbage juice left in the bowl into the jar.
- Make sure the cabbage juice covers the cabbage. If it doesn’t, let it rest a few minutes and press down again until it does.
- Top the cabbage with a grape leaf (optional), then a large cabbage leaf, and then a glass weight. The weight will help hold the cabbage under the liquid.
- Seal the jar with an airlock lid and set it out of direct light at room temperature (65°-75°) for 4-8 days.
- If the ph is at 4.6 or below and you’re satisfied with the sour taste after 4-5 days, it’s done.
- If you’re not satisfied with the taste, cover it with the lid again. Let the jar ferment outside the fridge 2-3 more days and then taste it again.
- Once fermented, store the finished sauerkraut in the refrigerator. It can store in the refrigerator for several months.
Notes
Clean all utensils, bowls, lids, and canning jars well with soap and water. Or, sterilize them before making this ferment if you prefer.
I usually use waterless airlock fermenting lids and glass canning jars for my quart and ½ gallon ferments. A wood tamper also helps with pressing the cabbage into the container. Glass weights help keep the cabbage beneath the brine.
The optional grape leaves keep the kraut crunchier. Place one on the bottom and one on top. The top leaf (along with an additional whole cabbage leaf) helps keep the small pieces of kraut in place.
Double this recipe to make ½ gallon of sauerkraut at a time. Sauerkraut is quite salty so add less salt to whatever meal you serve it with. Keep in mind, the salt is necessary for a safe ferment.
*If you are concerned about the ph levels of your ferment, you can purchase a ph tester to verify the acidity levels. According to Clemson Cooperative Extension, “Kraut fermentation, if done properly, will bring food to the “safe” acid level – pH 4.6 or below.”
- Prep Time: 30 minutes
- Category: Ferments